Saturday, January 5, 2013

Leapster Explorer Organizer

Now that Christmas is over, and the madness of the holidays is calming down... I can post! :)

I have been challenged by my mother to make 1 post every week in 2013. I accepted. So lets do this!

For Christmas both my daughters' received a Leapster Explorer, from what I hear kids love them for a long long time! I sure hope so! I was worried that at their young ages (3 & 4) they would lose all of the pieces that go along with it. There are different games, cords to the computer, and a camera attachment. So my wonderful mother (who thinks outside the box) bought 2 Timeless Beauty Bags from Thirty-One Gifts, and embroidered my girls' names on them to keep everything sorted.


I absolutely love them! At a quick glance I know if anything is missing from them and ensure before the girls go to bed that everything is back in its place. These really make traveling easy, also! The clip on the handle allows the bag to be clipped to the back of a seat, so kids have easy access to their different games.

<3 What would I do without that woman?? <3

Sunday, July 22, 2012

Toilet Paper Roll Bird Feeders

Here is a quick, easy, fun project for the kids! Or just you :). If you are like me, you save toilet paper rolls for that one project you find on Pintrest that involves toilet paper rolls (I have already pinned several!). Here is a simple one for you:

Creating a bird feeder is as simple as 1. 2. 3!!

1. Cover the bird feeders in peanut butter - not too thick but thick enough for wild bird seed to stick.
2. Roll it in a bowl of wild bird seed (any brand will do!).
3. String them on a tree that you can see from your window (so you can watch the birds eat it, of course!)
They blend well into the tree, so they don't look tacky. My girls loved to roll them in the seed, and sit and wait for the birds! We have a real bird feeder near these, so it was not hard for the birds to find them.

Easter Basket Storage

I am always looking for cheap ways to organize! Especially in our playroom. There are so many little toys that cause the room to never look clean - it drives me crazy!

Every time I am in Winn-Dixie (closest store to my house, so its #1!) I check out their clearance shelf. It usually only holds about 20 items, but they are extremely discounted. On my last trip I saw they had 3 Easter baskets left over, and in an obvious effort to get rid of them quickly, they had them marked all the way down to .24!! This was a must have.

Now I know you are thinking "Easter is about 8 more months away, why would you want those?" You should know by now that you have to think out of the box! :)

I cut off the large handle to the Easter baskets and placed them on shelving to make quick and easy storage containers. Best part is - they made the room very colorful! Now, thinking long term.... If I wanted these baskets in another room of the house that is less colorful - I can easily spray paint them to match any room. Cheap. Quick. Love it. 

Saturday, July 21, 2012

My Crayon Art

So, ill admit it. I am addicted to Pintrest. I am on it daily and have lists of items that I plan to make. I have already put a dent in them as I try to do 1 project a week. One of my favorite projects, because it is so easy to do, is crayon art.

I pinned my tutorial from this blog.

I already had some tiles in my house that were left over from our bathroom. So I went out and bought some crayons, and went at it!

#1 - I decided what color each letter would be. This one was my daughters name Chloe. I tried to keep the color scheme of the letters alternating and not having all of the darker groups together. Tip: the colors melt the same color that they look to your eye. You do not need to color with each of them because even if it colors green, if it looks blue- it will melt blue.


#2. I created my letters by using a Cricut. I used the Winnie The Pooh font cartridge, and used the shadow effect. Once I got the letters to the correct size, I traced them with pen onto my tile. (I had a pen near, no special reason why I picked it.)


#3. Take that paper off and start a fire! I picked a candle that was very low just so that it would melt faster. It did not take long for it to drip, so I would just put random spots around my letter, and then move onto the next crayon. I would typically do about 3 rounds of the crayons if I had about 4-5 of them within the group. This helps it even out the color.


FINISHED! I really love how it turned out. I went ahead and did my other daughters name, Ava. I am going to put them on shelves in their play room to add some color and personalization. As a gift to my mother, who's bedroom is grey black and red, I did a tile of a heart with red. It really turned out great! I see several of these in my future as gifts. In fact I have already taken advantage of the school supply deals going on right now and have bought 16 boxes of crayons for 25cents each! That's right 16 boxes for $4.00!


Daddy D's Green Thumb

On Memorial weekend we filled our time with a visit to a blueberry patch where we could pick our own blueberries for such a cheap price.


That was all it took to get my husband (Daddy D) into an old hobby of growing a garden. On our way home from the patch, we stopped at Do It Best to look at plants that we could grow at home. We bought a couple of them, including some herbs and tomato plants. Once we got home all we could think about is where to grow our garden. It only made sense to grow it in the back yard- however we have 3 large dogs that roam the backyard and would be hard to get them used to another area. Derrick proposed the idea of doing it in our front yard between the house and the walk way to the front door. I immediately thought it was a horrible idea and shot it down quickly. I didn't want people stealing our food or messing with our plants, plus the idea of a garden in the front yard sounded tacky to me. It took about 2 days of his non-stop talking about putting the garden there, until I started coming around to the idea. We knew it would be a lot of work.

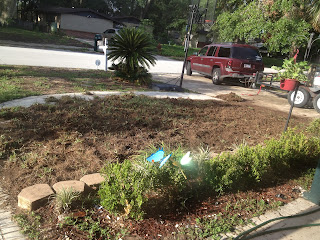
The first step was to till up the ground. Daddy D has a lawn business, so luckily we had the equipment available to us. It took about a full week to get all of the grass out of the area.


We then, by hand (because we could not find a tool to work well enough) pulled up all of the grass, and their roots, that was still left because we did not want it growing back. The little ones were very interested in helping!


After we pulled up all of the grass, we made trenches simply with a shovel, and added a small white fence to keep it more sectioned off from the flower bed that we were going to create around it. This was the worst stage of the garden because it was just a bunch of dirt, and not very pretty.


One by one the plants went in we have blueberries, blackberries, raspberries, corn, green beans, zucchini/squash, red and green bell peppers, Cajun bell peppers.. AND MORE!


We wanted to do something simple for the tiny flower bed around the garden so we bought some generic wildflower seed mix from Lowe's and spread TONS of it in the flowerbed area. We also added some mulch between the rows because it looked pretty and apparently its good for retaining water. Everything grew so much faster than I thought it would, and not too long after we had lots of green!!


Now our garden is very large, the corn is about 6 feet tall and the plants are starting to produce. The wildflowers are very tall and are blooming all over- makes for such a beautiful addition to the front yard, and always puts a smile on my face when I get home.


Best thing about a garden, it brings friends!!


Our Garden = Hagood Happiness!